How to Start a Vegetable Garden: Step-by-Step Guide
Starting a vegetable garden is a fantastic way to enjoy fresh produce, improve your health, and connect with nature. For beginners, the process might seem overwhelming, but with the right guidance, creating a thriving vegetable garden is achievable and highly rewarding. This detailed guide will help you understand every step, from selecting the perfect location to maintaining your garden for optimal growth. Whether you’re working with a backyard plot, a patio, or even containers, these tips will set you up for gardening success. Let’s dig in (pun intended) and start your gardening journey!
PLANTING GUIDES
11/16/202411 min read


1. Choose the Right Location
The location of your vegetable garden is one of the most critical factors in determining its success. Vegetables are living organisms that rely on sunlight, good soil, and proper water drainage to grow well.
Factors to Consider When Choosing a Location
Sunlight: Most vegetables, including tomatoes, cucumbers, and peppers, need 6–8 hours of direct sunlight daily. A sunny spot in your yard or patio will ensure your plants can photosynthesize effectively, which is essential for growth and fruit production. If your space is limited, consider growing leafy greens, which can thrive in partial shade.
Soil Quality: The ground should have loose, well-draining soil that allows roots to spread easily. Avoid areas prone to waterlogging after rain. Poor soil quality can be amended with compost and organic matter.
Water Access: Choose a location near a water source. Vegetable gardens need consistent watering, especially during the growing season, so proximity to a hose or water supply is essential for convenience.
Protection from Wind and Wildlife: High winds can damage delicate plants, so choose a spot with natural windbreaks, such as hedges or walls, or consider using barriers like fencing. Additionally, position your garden away from areas frequented by wildlife, such as deer or rabbits, which may feed on your plants.
Pro Tips for Beginners
Use a sunlight meter to evaluate the sun exposure of different spots in your yard. This tool is especially helpful if you’re unsure how much light your space receives.
If your yard is too shady, you can grow vegetables in containers on a sunny balcony or patio.
Recommended Tools and Resources
Sunlight Meter to assess light exposure.
Garden Fencing to keep pests away.
2. Plan Your Garden Layout
Before planting, it’s essential to plan how you’ll organize your garden. A thoughtful layout ensures your plants grow well, are easy to maintain, and utilize space effectively.
How to Plan an Efficient Layout
Start Small: For beginners, starting with a manageable size, like a 4x4-foot plot or a few raised beds, is ideal. This allows you to learn the basics without feeling overwhelmed.
Plant Grouping: Arrange plants with similar needs together. For example, group water-loving vegetables like cucumbers with melons or heat-tolerant plants like peppers with tomatoes.
Accessibility: Leave enough space between rows for easy access to weeding, watering, and harvesting.
Vertical Gardening: Utilize vertical space by growing vining plants like peas or beans on trellises. This saves ground space and makes harvesting easier.
Crop Rotation: Plan for future seasons by rotating crops to different areas each year. This prevents soil nutrient depletion and reduces the risk of pests and diseases.
Popular Vegetables for Beginners
For your first garden, choose easy-to-grow vegetables that offer high yields:
Tomatoes: Thrive in sunny conditions and can be grown in beds or containers.
Zucchini: A low-maintenance plant that produces abundantly.
Lettuce: Grows quickly and is perfect for small spaces.
Herbs: Basil, parsley, and cilantro are great for adding flavor to dishes and are easy to grow indoors or outdoors.
Pro Tips for Small Gardens
Use raised beds to control soil quality and prevent weeds.
Try companion planting to maximize yields; for example, plant marigolds alongside tomatoes to repel harmful pests.
Recommended Tools and Resources
Garden Planner App to design your layout digitally.
Raised Bed Kit for easy setup and maintenance.


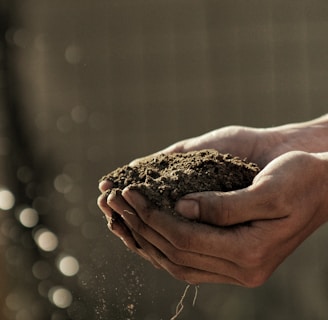
3. Prepare the Soil
Good soil is the foundation of a thriving vegetable garden. Without nutrient-rich and well-structured soil, even the best gardening efforts can fail.
Steps to Prepare Your Soil
Test the Soil: Start by testing your soil’s pH and nutrient levels using a soil test kit. Most vegetables prefer slightly acidic to neutral soil, with a pH between 6.0 and 7.5.
Improve Soil Quality: Based on your test results, amend the soil to meet your plants’ needs:
Add compost or aged manure to boost organic matter and improve nutrient content.
Mix in perlite or sand for heavy clay soil to improve drainage.
Use peat moss for sandy soil to retain moisture.
Loosen the Soil: Use a garden fork or tiller to loosen compacted soil, ensuring proper aeration and easy root penetration.
Mulch: Spread a 2–3 inch layer of mulch on top of your garden bed to retain moisture, regulate soil temperature, and suppress weeds.
Pro Tip
Avoid using chemically treated materials like fresh manure, as they can harm plants. Stick to organic options whenever possible.
Recommended Tools and Resources
Soil Test Kit for accurate pH readings.
Organic Compost to enrich your soil.

4. Select Your Seeds and Seedlings
Choosing the right seeds and plants for your garden is exciting and critical to success.
How to Choose Seeds
Beginner-Friendly Plants: Start with easy-to-grow crops like radishes, green beans, and carrots. These vegetables are forgiving and grow quickly.
Climate-Appropriate Crops: Select seeds that are well-suited to your local climate. For example, grow heat-tolerant vegetables like peppers in warmer regions and cool-season crops like broccoli in colder areas.
Organic and Non-GMO Options: For healthier and environmentally friendly gardening, opt for organic or non-GMO seeds.
Seedlings vs. Direct Sowing
Use seedlings for plants with long growing seasons, like tomatoes and peppers, to give them a head start.
Directly sow seeds for crops that germinate quickly or don’t transplant well, like carrots, peas, and beans.
Pro Tip
Keep track of your planting dates using a gardening journal or planner.
Recommended Tools and Resources
Seed Starter Kit to germinate seeds indoors.
Organic Vegetable Seeds for a chemical-free start.


5. Plant Your Garden
Planting is one of the most exciting steps in creating your vegetable garden. It’s where all your preparation comes together, and you finally get to see your hard work start to take root—literally. However, to set your garden up for success, planting must be done thoughtfully, taking into account spacing, depth, timing, and plant care. Here’s how to plant your garden the right way, step by step.
1. Plan Your Planting Layout
Before digging into the soil, revisit your garden layout plan. Ensure you’ve designated specific spots for each vegetable based on its sunlight, water, and space requirements. For example:
Tall plants like tomatoes or corn: Place these at the back or in areas where they won’t shade shorter plants.
Vining plants like cucumbers or peas: Position these near trellises or support structures.
Quick-growers like lettuce: Plant these in accessible areas for easy harvesting.
Proper planning prevents overcrowding and ensures every plant has the resources it needs to thrive.
2. Check Soil Moisture
Make sure your soil is moist but not soggy before planting. Dry soil can make it difficult for seeds to germinate or for seedlings to establish roots, while overly wet soil can cause waterlogging. If the soil feels dry, lightly water it a few hours before planting.
3. Sow Seeds or Transplant Seedlings
There are two main ways to plant vegetables: sowing seeds directly into the soil or transplanting seedlings.
Sowing Seeds:
Check the seed packet for specific instructions on planting depth and spacing.
As a general rule, plant seeds at a depth of 2–3 times their diameter. For example, smaller seeds like lettuce should be sown closer to the surface, while larger seeds like beans can be planted deeper.
Gently cover the seeds with soil and pat it down lightly to ensure good seed-to-soil contact. This helps with germination.
Transplanting Seedlings:
Dig a hole slightly larger than the root ball of the seedling.
Gently remove the seedling from its container, being careful not to damage the roots. If the roots are tightly wound (root-bound), loosen them gently with your fingers to encourage outward growth.
Place the seedling in the hole, ensuring the base of the stem is level with or slightly above the soil surface. Cover the roots with soil and press it down gently to eliminate air pockets.
4. Spacing Matters
Proper spacing is crucial for healthy plant growth. Overcrowding can lead to competition for sunlight, water, and nutrients, resulting in weak plants and lower yields. Refer to the guidelines on your seed packet or plant label for optimal spacing.
For example:
Tomatoes: Space 18–24 inches apart to allow air circulation and prevent fungal diseases.
Carrots: Plant 2–3 inches apart, as their roots need room to expand underground.
Zucchini: Space at least 24–36 inches apart to accommodate their large, sprawling leaves.
Step-by-Step Planting Example
Let’s say you’re planting tomatoes:
Dig a hole twice as wide and deep as the plant’s root ball.
Mix some compost or slow-release fertilizer into the hole to enrich the soil.
Remove the tomato seedling from its container and plant it deeply, burying two-thirds of the stem. Tomatoes can develop roots along their buried stem, which makes them sturdier.
Fill the hole with soil, press gently, and water thoroughly.


5. Label Your Plants
If you’re planting multiple crops, it’s easy to forget what went where. Use plant markers or labels to identify each row or section. This is especially helpful for slower-germinating seeds where results aren’t immediately visible.
Timing Your Planting
Knowing when to plant is as important as how to plant. Timing depends on the vegetable variety and your local climate.
Cool-Season Vegetables: Crops like lettuce, spinach, and peas thrive in cooler temperatures and can be planted in early spring or fall.
Warm-Season Vegetables: Tomatoes, peppers, and squash need warm soil and air temperatures, so wait until the risk of frost has passed in late spring or early summer.
Consult your local agricultural extension service or gardening resources for planting calendars specific to your region.
Water Immediately After Planting
Once your seeds or seedlings are in the ground, give them a thorough watering. This helps settle the soil around the roots and provides the moisture necessary for growth. Use a gentle spray to avoid washing away seeds or compacting the soil.
Mulch for Protection
After planting, spread a layer of mulch (such as straw, wood chips, or dried leaves) around your plants. Mulch provides several benefits:
Retains soil moisture, reducing the need for frequent watering.
Regulates soil temperature, keeping roots cool in hot weather.
Prevents weed growth, reducing competition for nutrients.
Common Planting Mistakes to Avoid
Planting Too Deep: Some plants, like lettuce and spinach, won’t germinate if buried too deeply. Always check seed-specific instructions.
Ignoring Frost Dates: Planting warm-season crops too early can stunt their growth or kill them.
Overcrowding: Plants that are too close together may produce smaller yields due to resource competition.
Pro Tips for Success
Keep a planting journal to track what you planted, where, and when. This will help you refine your gardening methods in future seasons.
If you’re short on space, consider companion planting. For example, pair fast-growers like radishes with slower-growers like carrots, as the radishes will be harvested before the carrots need more room.
Recommended Tools and Resources
Plant Markers for easy plant identification.
Seed Starter Kit to germinate seeds indoors.
Compost for enriching planting holes.
6. Watering Basics
Watering is one of the most critical aspects of gardening. Both overwatering and underwatering can harm your vegetable plants, so understanding how much and how often to water is essential for maintaining healthy growth.
How to Water Your Garden Properly
Know Your Soil:
Sandy soil drains water quickly, requiring more frequent watering.
Clay soil holds water longer, so water less often but more deeply.
Water Deeply: Instead of giving your plants small amounts of water frequently, focus on deep watering. This encourages roots to grow deeper into the soil, making your plants more drought-resistant. Aim to water until the soil is moist 6–8 inches deep.
Morning is Best: Watering early in the morning allows plants to absorb moisture before the day heats up. It also reduces the risk of fungal diseases, as leaves dry quickly in the sunlight.
Adjust for Weather: During hot, dry spells, check your soil more frequently to ensure it stays adequately moist. After heavy rains, avoid watering to prevent root rot.
Common Watering Mistakes
Overwatering: Leads to waterlogged soil, root rot, and the death of beneficial microorganisms.
Underwatering: Causes wilting, stunted growth, and poor yields.
Pro Tip
Install a drip irrigation system to deliver water directly to the roots. This reduces evaporation and ensures even watering across your garden.
Recommended Tools and Resources
Drip Irrigation Kit: Saves water and ensures consistent delivery to plants.
Soaker Hose: An affordable alternative for watering rows.
Soil Moisture Meter: Helps you avoid overwatering by checking soil hydration levels.
7. Fertilizing Your Garden
Fertilizer provides your plants with essential nutrients they may not get from the soil alone. Learning how and when to fertilize can significantly impact the health and productivity of your garden.
Why Fertilize?
Vegetables are heavy feeders that quickly deplete soil nutrients. Fertilizing replenishes these nutrients, ensuring robust growth, vibrant foliage, and plentiful harvests.
Types of Fertilizers
Organic Fertilizers:
Compost, aged manure, or products like bone meal and fish emulsion.
These are slow-releasing and improve soil structure over time.
Synthetic Fertilizers:
Formulated for quick results but should be used carefully to avoid burning plants.
Check for balanced fertilizers (e.g., 10-10-10), which provide equal amounts of nitrogen (N), phosphorus (P), and potassium (K).
Specialized Fertilizers:
For example, high-nitrogen fertilizers for leafy greens or potassium-rich blends for root vegetables.
When and How to Fertilize
Before Planting: Incorporate slow-release fertilizers or compost into the soil to create a nutrient-rich base.
During Growth: Use liquid fertilizers every 2–4 weeks, particularly for heavy feeders like tomatoes and peppers. Follow package instructions to avoid overfertilizing.
Side-Dressing: Sprinkle granular fertilizer around established plants, avoiding direct contact with stems and leaves.
Pro Tip
Rotate crops each season to naturally maintain soil fertility and reduce the risk of nutrient depletion. For example, plant nitrogen-fixing crops like beans after heavy feeders like tomatoes.
Recommended Tools and Resources
Organic Vegetable Fertilizer: Safe and effective for most garden plants.
Compost Bin: Turn kitchen scraps into rich, organic fertilizer.
Liquid Fertilizer Sprayer: Makes application easy and even.


8. Managing Pests and Diseases
No garden is entirely free from pests and diseases, but with a proactive approach, you can keep your plants healthy and productive.
Identifying Common Garden Pests
Aphids: These tiny insects cluster on leaves and stems, sucking plant sap.
Solution: Spray plants with neem oil or use insecticidal soap.
Slugs and Snails: Often attack leafy greens at night.
Solution: Set up beer traps or sprinkle diatomaceous earth around plants.
Tomato Hornworms: Large green caterpillars that chew through tomato plants.
Solution: Handpick and remove them; they’re easy to spot on the leaves.
Preventing Diseases
Avoid Overcrowding: Space plants properly to allow good air circulation, reducing the risk of fungal infections.
Water Wisely: Always water at the base of plants rather than overhead to prevent mold and mildew.
Crop Rotation: Change the location of plant families (e.g., nightshades like tomatoes and peppers) each season to disrupt pest cycles.
Pro Tip
Plant pest-repellent herbs like basil, marigold, and garlic alongside your vegetables. These companion plants naturally deter insects.
Recommended Tools and Resources
Neem Oil: An all-natural pest solution.
Row Covers: Protect plants from insects and frost.
Disease-Resistant Seeds: Minimize susceptibility to common issues.
9. Maintaining Your Garden
Regular maintenance is essential to ensure your vegetable garden continues to thrive throughout the growing season. A little effort goes a long way in keeping plants healthy and productive.
Ongoing Garden Maintenance Tasks
Weeding:
Weeds compete with vegetables for nutrients, water, and sunlight.
Use a hoe or hand-pull weeds weekly to keep them under control. Adding mulch can also minimize weed growth.
Pruning:
Remove dead or damaged leaves to improve airflow and reduce the risk of disease.
For vining plants like tomatoes, prune suckers (small shoots between the main stem and branches) to focus energy on fruit production.
Checking for Problems:
Inspect plants regularly for signs of pests, diseases, or nutrient deficiencies. Early intervention is key to resolving issues.
Harvesting:
Harvest vegetables promptly when ripe to encourage further production. For instance, picking zucchini regularly prevents it from becoming overly large and tough.
Pro Tip
Keep a garden journal to record what you plant, when you harvest, and any challenges you encounter. This will help you improve your gardening techniques season after season.
Recommended Tools and Resources
Garden Hoe: Makes weeding more efficient.
Pruning Shears: Essential for trimming and maintaining plants.
Gardening Notebook: Track your garden’s progress and lessons learned.

